
Landscape lighting is an excellent option to emphasize and enhance the features of your yard and house, however, If you’ve decided to install the lighting yourself You’ll notice that it’s usually available in kits that include pre-cut pieces of wire.
For many it’s acceptable, but when your yard is bigger than what the manufacturer suggests or you have a unique idea regarding where you can place the lights, these lengths might not be sufficient and you might need to connect low-voltage lighting wire. With a few tools and some work, you are able to modify your lighting landscape.
This article provides you with information on how to splice (join) low voltage landscape lighting wire, the tools and materials needed, and instructions to make good quality splices. Good quality splices are critical in minimizing unwanted resistance in your circuit which can be detrimental to its performance.
The instructions provided in this article are for joining similar types of wire (i.e. all 18 or 16 gauge THHN). If you are attempting to join dissimilar gauges of wire, there are different methods that may be employed based upon the size difference between the wires being joined!
Size Of Wires

No matter what size wire you are using, the laws of Ohm’s Law apply. This law simply states that the amount of current (amps) flowing through a conductor is directly proportional to the voltage supplied by the source and inversely proportional to the resistance offered by the conductor at any given temperature.
The larger diameter wires will have less resistance than smaller diameter wires for equal length runs due to their thicker cross-sectional area. If two dissimilar types or sizes of wire are attempting to be joined together, one must take into account this difference in resistance before choosing an appropriate splice technique!
For instance, if one were splicing 18AWG THHN with 14 AWG THHN (the same voltage), it would not be advisable to melt the 14 AWG wire into the 18 AWG wire, as this would create high resistance joints.
Tools And Materials Needed
- Wire cutters
- Wire strippers
- Soldering iron
- Electrical tape or heat shrink tubing (optional)
- Butt splice connectors (optional, if you are using solid core wires)
- Power supply
- Voltage drop calculator (optional but recommended, see below for more details )
Splicing Wires Without Using Butt Splice Connectors
If your wires do not have extra insulation around them that is thicker than what’s covering the individual strands of metal inside then they are what is known as “solid core” wires. Solid core wires can usually be differentiated by looking at one end of the wire where you will see that the individual strands are exposed (not covered with insulation).
If your wires are solid core, then there is no need for additional insulation or to strip off any of the existing insulation, simply cut both ends square and even, strip off about 1/2 inch of the insulation from each wire and twist all strands together tightly. This can be done using a pair of needle-nose pliers which is what I used in my example splices below.
To fasten them together without solder or connectors you can twist or crimp them together using mechanical means or by heating the stripped almost to the point when they start to melt (but not burnt) and the metal begins to fuse together. A cigarette lighter may come in handy for this task.
Western Union Splice
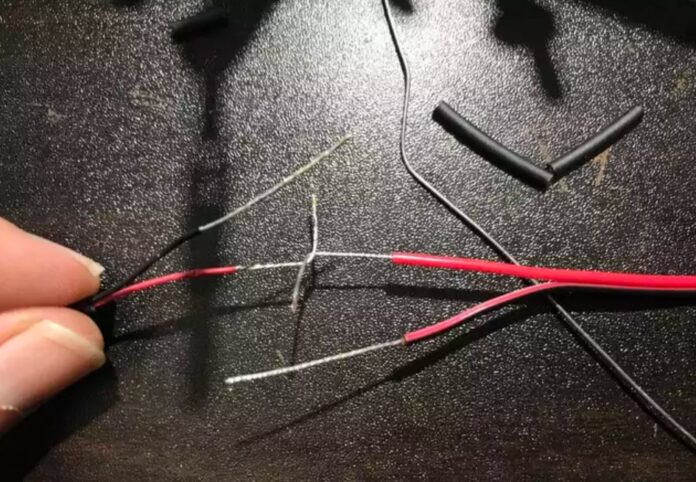
One of the easiest techniques to use is known as the “Western Union splice”. This is where you simply twist one wire around another tightly, make sure they are snuggled up against each other, then snip off any excess exposed wire (and burn it with a lighter if necessary). Make absolutely certain that your wires are secured tightly enough that they will not slip out later on!
There are also some mechanical methods or grips called crimpers that can secure or secure solid core wires but these can be expensive! If using connectors is an option, I strongly recommend them over trying to mechanically connect the wires using grips or solder (see “Splicing Wires With Butt Splice Connectors” for more information).
Solder Splice
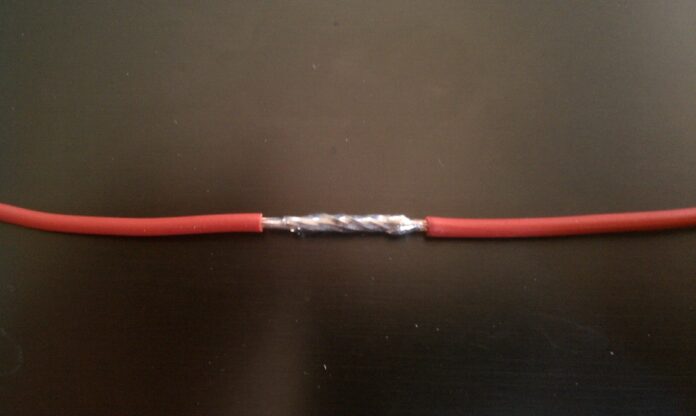
If you are lucky enough to have some type of butt splice connector on your wires, soldering the wire together will produce a permanent connection that is weather-resistant and should hold up against most types of environmental conditions.
To do this simply twist the two stripped ends tightly together, then apply solder to the twisted wire at the point where you stripped off the insulation exposing bare wire. Make sure you don’t let any excess solder drip onto other parts of your wire!
The outside insulation of whatever wire you are using must also be big enough so as not to come into contact with any of the exposed strands of metal inside or it will likely cause a short circuit.
In the example below I am using a butt splice connector but you could also use a strand or two of the solid core wire in place of the butt splice if that’s what you have available. Just make sure it is a solid core and has no insulation on it! Generally, most 12 AWG to 10 AWG solid core wires should work pretty well for this kind of connection without mechanical help or soldering.
Voltage Drop Calculator By knowing how much voltage your landscape lighting system requires and the length of wire from your power source to where you plan on putting your lights/switches, one can determine roughly how much voltage is going to be lost due to resistance between points.
Read Also: Guide on How to Wire a Bathroom Fan and Light on Separate Switches
Conclusion
If you are new to landscape lighting wiring, think of it like plumbing where water (or electricity) is trying to reach the farthest point in your yard. If it runs through a series of elbows or direction changes then that will reduce how much water actually makes it to the end.
By following this tutorial you should be able to do most low voltage splicing on your own without having to rely on someone else to get the job done!
")

